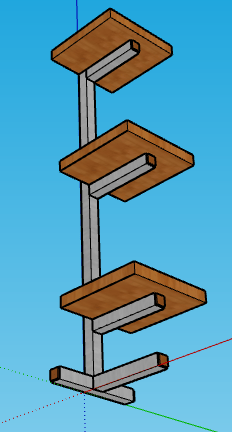
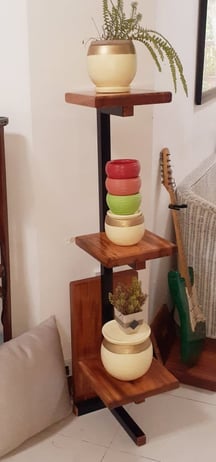
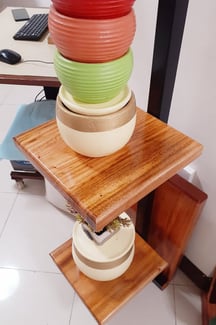
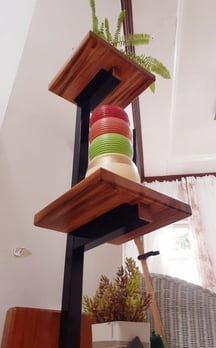
THREE-TIER PLANT STAND
This three-tier kiln-dried mahogany plant stand is a simple build that one can do in a day.
LATEST POST
There is not a house today without ornamental plants in and around it. Nothing. Even churches and hospitals get spruced up with hanging plants, landscapes, and hedges. Hell, they even decorate cemeteries with flowers, carpet-like grass, and ornamental plants that live on the organic remains. Ew.
Yet you will agree that a considerable part of these decorations are presentation. A humble plant on lovely pottery is ten-fold better looking than it looks when done in reverse. For truly indeed, just like food presentation and restaurant décor play an essential factor in the overall dining experience, so too are ornamental plants decoration ought to take the same treatment.
And for this reason, countless plant stand designs and potteries came out as plentiful as you can imagine or to the limits of how you conceive them to be.
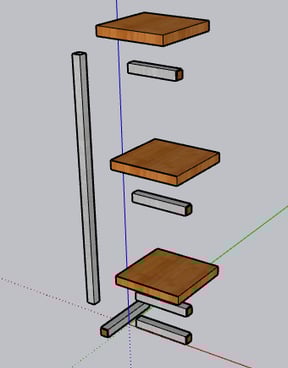
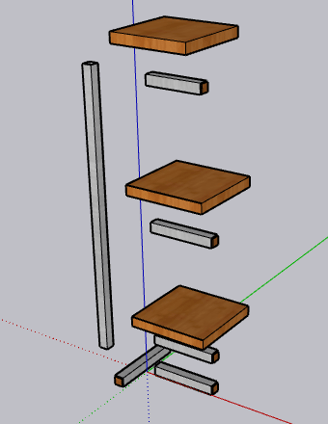
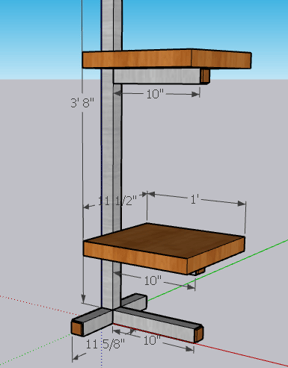
My version is simple that you can do it yourself. To start you with, I included the cut list, measures, and materials. I also had a drawing of where each of these pieces come and get welded in. With the right tools, you can do this in half a day, with the other half allocated for the paints to convalesce.
MATERIALS:
1. Steel square tube, 1.5”, at least 2 mm thickness
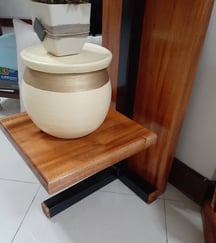
2. Timber for the plant to sit, one (1) square foot (preferably mahogany, 1.5” thickness
3. Sanding sealer, lacquer thinner, lacquer Flo, paintbrush (1.5”)
4. Clearcoat of Polyurethane. I use the high gloss PYE brand.
5. 2.5 mm diameter 6011 welding rod, two pcs
6. High gloss, black acrylic spray can, one pc (kana bang Pilux)
7. Black screws, 1”, 12 pcs
8. Flat bar, 3 mm thickness
TOOLS:
1. Table saw – hand saw or serotso will do
2. Impact driver – Philips screwdriver
3. Welding machine – get to a neighbor that has a lunch box sized welding machine
4. Trim router (optional) using ½ inch round over router bit
PROCEDURE:
1. Referencing the drawing, cut all the material to size.
2. Clean the steel square tubes. Ensure there are no rusts and metal burs. To do this, run your fingers through the whole span of the faces of these tubes. If you feel anything, bumps or burs, perhaps, continue sanding these spots until you have nothing but the cold dead steel.
3. Weld the pieces of square tubes together to shape.
4. Paint with the spray can. While spraying, stay away from your car, neighbor, and wife. They don’t like the smell, and I bet you don’t like it too.
5. Apply two coats of sanding sealer to your timber. When dry, get one coat of clear coat polyurethane.
6. Volt it all in like Steve Armstrong of the iconic Voltes Five calls his team to volt-in.
And that should all be there is to the build. Enjoy. Give me pictures of your build in the comment section below.
You need the following materials to put these together. These are:
As a woodworking enthusiast, I have many tools; I will list those tools that I need for this project as well as the tools that most households owners with a hint of interest in DIY would most likely have.
Get our weekly newsletter:
DOUGLAS REY B. BERIDO
drberido@yahoo.com | Kagudoy Road, Basak, Lapu Lapu City, Cebu, The Philippines